
Learn how to use MQTT to monitor wind speed and obtain wind speed statistics for a specified location in this project.
Because I once struggled to control the drone due to the wind, I’d want to assess the wind speed to see if it’s acceptable for drone flight in the wild.
So I’m considering how to measure wind speed in the field so that I can check it from anyplace.
After days of learning/studying, I was able to solve this properly using Arduino and MQTT, as well as several Makerfabs hardware components.
What is MQTT and how does it work?
MQTT (Message Queuing Telemetry Transport) is a machine-to-machine protocol for lightweight message publishing and subscription. By keeping packet headers as minimal as feasible, it reduces network bandwidth and resource needs while assuring dependability.

MQTT is a data transfer protocol for the Internet of Things (IoT). It’s designed specifically for devices with less processing power. It also allows devices to be used in a variety of IoT applications. Setting up a MQTT system to manage your pub/sub messaging requirements can have a significant impact on your workflow:
- It is simple to develop.
- Scalability is a big plus.
- Transmit and receive data in a timely and effective manner.
- Reduce the amount of bandwidth used by the network.
Transports for MQTT
MQTT is most commonly used with TCP/IP, however it may also be used with other bi-directional transports. MQTT offers techniques for specifying desired actions on specified resources.
MQTT uses the following methods:
- Connect – Waits for a connection with the server to be established.
- Disconnect – Waits for the MQTT client to finish any work that has to be done before disconnecting the TCP/IP session.
- Subscribe – Tells the server that the client wants to be able to subscribe to topics.
- Unsubscribe — This command instructs the server to allow the client to unsubscribe from a topic.
- Publish — After transmitting requests to the MQTT client, returns to the application thread instantly.
MQTT clients and MQTT brokers make up a MQTT network. MQTT Client can be any device that runs the MQTT library and connects to the MQTT broker over any network, from a microcontroller to a full-fledged server. The MQTT Broker is in charge of receiving all messages, filtering them, making decisions, and forwarding them to subscribed clients.
MQTT client devices and apps publish and subscribe to topics managed by a broker instead of connecting with a server. Instead of being delivered directly from client to client, the messages are published to “topics.” The broker then sends the communications to any clients who have signed up for them. MQTT is a publish/subscribe protocol at its core. Clients can connect as either a publisher or a subscriber, or both.
Messages sent using MQTT
MQTT’s message consists of two parts: “topics” and “payload.” MQTT is built around “topics.” The “payload” refers to the precise material that the subscriber is looking for.
To subscribe to a topic on the MQTT network, the client must first send a subscribing request to the broker. The request might cover a variety of themes. A subscription acknowledged answer is sent by the broker in response to the request. Subscriptions also contain a QoS parameter that may be used to lower the published message’s quality of service. Network designers can select between limiting data transmission and boosting dependability using three distinct Quality of Service (QoS) levels.
QoS 0 (zero) ensures that a message only reaches its intended destination once.
When message delivery is crucial, QoS 1 is applied. This is accomplished by holding messages in a queue until the subscriber is available to receive them.
When a communication must arrive once and only once, QoS 2 is utilised.
In many circumstances, the message is always broadcast at a reduced quality of service level. Messages may be kept at the broker until a device is ready to receive them, thanks to MQTT.
Broker for MQTT
There are several MQTT brokers available, including open source, commercial implementations, and managed cloud services. mqtt.org has a comprehensive list of MQTT brokers. Instead of using the server I constructed, I used the produced server as a broker in my project. This tutorial will use Mosquitto, an open source MQTT broker that is widely accessible. The connection to the Mosquitto server is test.mosquito.org. By connecting to the Mosquitto server, the client may publish and subscribe to the broker.
What is the nature of my project?
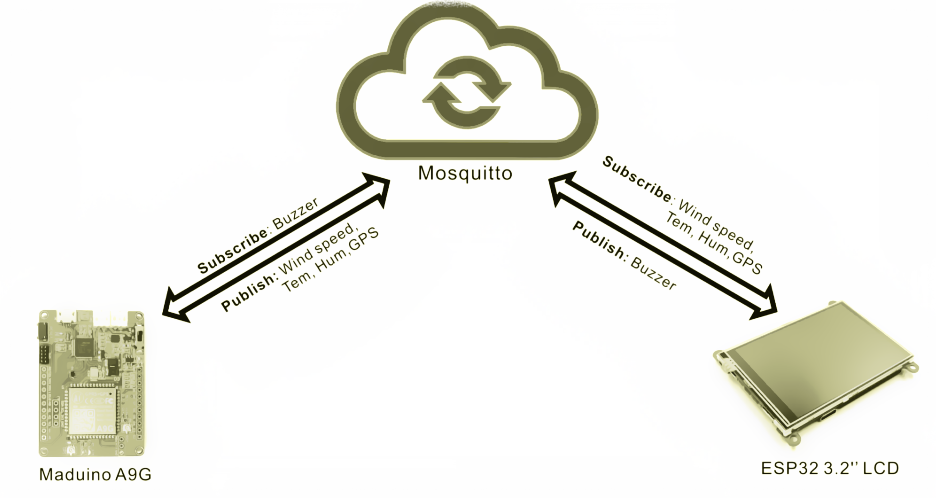
I intended to construct two clients based on the aforementioned information in order to conclude conversation with an available broker. As shown in the diagram below, one client receives and displays data (such as wind speed, temperature, and humidity).

As a client, Maduino A9G
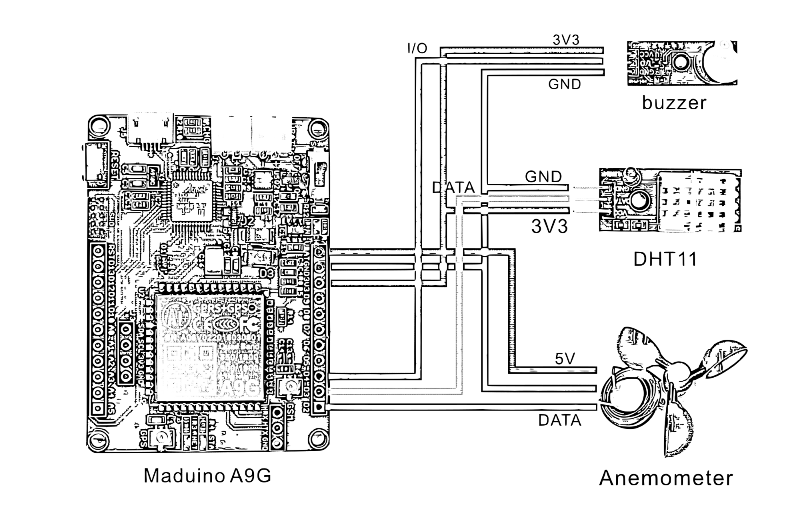
I used a Maduino A9G as a client and placed it outside to collect data on wind speed, GPS position, temperature, and humidity. The A9G module on the Arduino may send a message to a MQTT server. It signifies that the module may publish and subscribe to MQTT messages. A9G can also obtain GPS, send messages, make phone calls, and so forth. I wanted GPS to prevent the module from being lost in the outdoors. I attached a buzzer to the module so that I could use another client to send messages to make the buzzer sound.
I created a SIM card to ensure that the A9G may connect to the network in any location.
The preparation is as follows:
- Maduino A9G module
- Anemometer
- DHT11 module
- Buzzer
- SIM card
- Battery
- Breadboard
- Jump wires
Firmware for the Maduino A9G
- The firmware for the Maduino A9G may be downloaded from Github and installed to the board.
- A9AT G’s instructions for configuring the MQTT client and retrieving the GPS. It is necessary to make the client ID the sole one.
AT+CGATT=1       // Connect to the network
AT+CGDCONT=1,”IP”,”CMNET”   // Set PDP Parameters
AT+CGACT=1,1      // Active the PDP
AT+MQTTCONN=” test.mosquitto.org”,1883,”XXXX”,120,0  // Send MQTT connection packet
AT+MQTTSUB=”TOPIC”,1,0      // Send MQTT subscribe packet
AT+MQTTPUB=”TOPIC”,”PAYLOAD”,0,0,0   // Send MQTT publish packet
AT+MQTTDISCONNN    // Disconnect MQTT
The instruction to obtain the GPS from A9G.
AT+GPS=1   //Open the GPS
AT+LOCATION=2   // Get the location
AT+GPS=0     // Close the GPS
Establish a connection with the MQTT broker.
sendData("AT+MQTTCONN=\"test.mosquitto.org\",1883,\"mqttx_0931852d34\",120,0", 1000, DEBUG);
To regulate the buzzer, subscribe to the message.
sendData("AT+MQTTSUB=\"/public/TEST/makerfabs-B\",1,0", 1000, DEBUG);
Find out how fast the wind is blowing.
float windspeek = 0;
if ((millis() - lastDebounceTime) >= debounceDelay) {
int  currenTime = millis();
windspeek = Count*0.0875*debounceDelay/(currenTime-lastDebounceTime);
lastDebounceTime = currenTime;
Count=0;
Couttime_t++;
SerialUSB.print(windspeek);
SerialUSB.println("m/s");
}
Send the wind speed to the broker through the “/public/TEST/makerfabs-W” topic.
String topic_W = "AT+MQTTPUB=\"/public/TEST/makerfabs-W\",\""+(String)windspeek+"\",0,0,0";
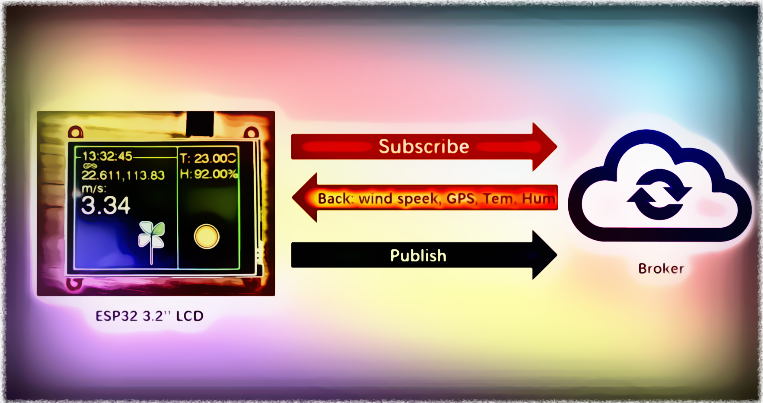
sendData(topic_W, 1000, DEBUG);As a client, the ESP32 3.2″ LCD
To subscribe to the sensor data message, I utilised the ESP32 3.2″ LCD as the other client. The ESP32 3.2″ LCD, which runs Arduino’s MQTT client library, may be used as a client to connect with the MQTT broker through WiFi. It also features an LCD display that shows the subscription message. Also, the ESP32 3.2″ LCD has touch capability, thus it may be used as an input device. To operate the buzzer that is attached to the subscriber, touch the circle on the screen to publish a message (Maduino A9G).
Firmware for the ESP32
Download the firmware from GitHub and transfer it to the ESP32.
Finally,
Multiple clients can publish and subscribe using a MQTT broker. Client library-based devices and programmes can connect to the broker to subscribe to wind speed and messages.
The MQTT protocol is a key component of successful IoT projects since it is both strong and sophisticated. I hope you find the information above useful in developing a MQTT project.
“Sometimes truce is the most important part of the war” -KP
Helping Hands.


Thanks for sharing this project. I present this idea in my company and everybody loved it 😉