
SUPPLIES AND PARTS
- Arduino Nano R3
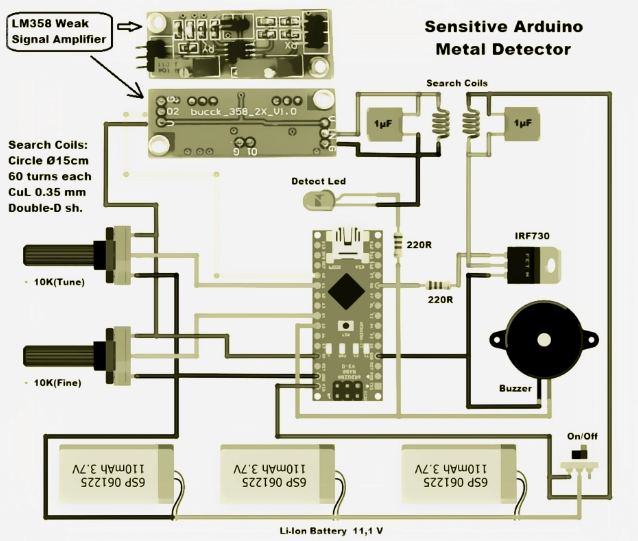
- module for weak signal amplification with LM358
- IRF730 mosfet transistor
- Rotary Potentiometer, 10 kohm
- Buzzer
- LED (generic)
- Rechargeable Battery, Lithium Ion
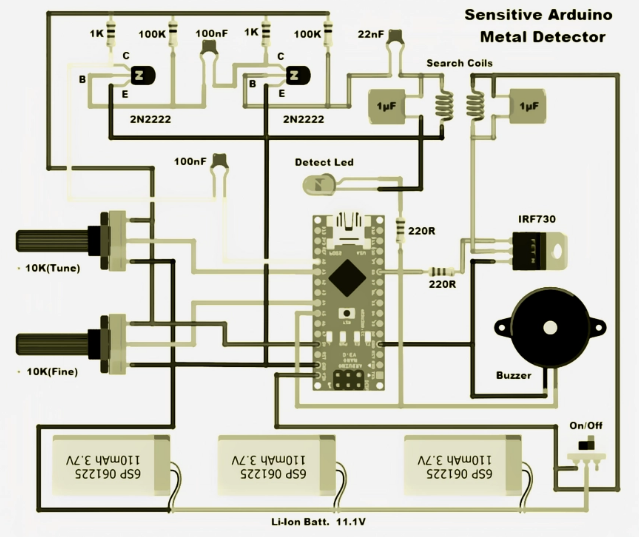
- General Purpose Transistor NPN (2nd version)
- Resistors and capacitors (2nd version)
TOOLS AND MACHINES REQUIRED
- Soldering iron (generic)
- Solder Wire, Lead Free
CONTENT AND ONLINE SERVICES
Arduino IDE
THIS PROJECT’S CONTEXT
A metal detector is a device that looks for metal in the immediate area. This time, I’ll demonstrate how to assemble a very sensitive metal detector of the “Inductoion Balance” kind using an Arduino microcontroller and a number of other parts.
Two coils are used in the Induction Balance concept, and they are positioned so that there is essentially no inductive pick-up between them. One is provided a signal that has been modified. The electromagnetic field is altered when metal is brought close, and the other coil detects a noticeably stronger signal.
You may watch the creation of many metal detector kinds in a couple of my earlier films. This detector is the most sensitive in terms of detecting capabilities, but it also has the huge advantage of not requiring a smartphone, unlike one of the earlier models with a sensitivity comparable to this one. Thanks to the microcontroller and the LM358 IC module for weak signal amplification, both of which can be purchased for about fifty cents, the build is quite straightforward.
For those who are unable to purchase this module, I have also provided a schematic model in which the device’s sensitivity is the same as in the earlier example and the amplification is accomplished using two conventional NPN transistors.
The Arduino creates a signal on pin 8, which is then amplified by a MOSFET transistor and supplied to the Transmitter coil. This is the basic working mechanism. The receiver coil signal is then amplified using an LM358 module (or two transistors in the alternative) and sent to the A0 analogue input. Additionally, two potentiometers on analogue inputs control the instrument’s sensitivity by controlling the response threshold. When a metal object is found, the buzzer and Led provide a sound and visual alert.
As I already indicated, the gadget is rather easy to construct and has the following parts:
- Arduino nano microcontroller
- LM358 low signal amolifier module
- Power mosfet transistor (in my case STP65NF06, but you can use any Power mosfet, for example IRF630)
- Two potentiometers 10K ohms
- Buzzer
- Led
and Double D shape search coils with appropriate capacitors, in this case 1 microF.
You may get a PCB prototype from PCBWAY to complete this project. Ordering is quite simple, and you can obtain 10 PCBs for $5 with excellent TG150-160 PCB quality. For this circuit, you may create Gerber files and upload them to their website. Orders are typically sent between 3 to 5 days.
Finally, a few remarks on the coils. They are made up of 60 turns of 0, 4mm2 (32 swg) enamelled copper wire wound into a 15 cm-diameter circular. They are then twisted into a letter D form. When the wire is withdrawn from the former, it should be tightly twisted, maintained well-bunched, and taped. Such coils must be used in pairs and must be the same. My earlier videos include additional information on winding coils.
Most of the detector’s sensitivity is determined by the coils, particularly by where they are placed. The most enjoyable part of creating a gadget is getting them in the right position, even if it takes a lot of time and patience, especially when we get the best performance.
The two coils must first be gently fixed into the shape shown in the video. Turn on the detector, then gently adjust the coils to the location where the sound will be lost with both potentiometers about in the centre. Then the potentiometers are moved to the location just before the sound is heard.
The procedure is currently being tested with a bigger metal item. Until we get the highest sensitivity, this operation must be performed several times. By rotating the two potentiometers in the opposite direction, we may try to enhance the sensitivity even more in the amplifier module version, but this makes the detector more unstable and sensitive to even small coil displacements.
This detector, as you can see in the video, can pick up a little coin at a distance of 20 cm or more, a hard drive at a distance of 40 cm, and a huge metal item at a distance of more than 80 cm.
Of course, the state of the soil affects our capacity to find items buried in it. The best medium is dry sand, while the worst one is clay.
Code
void setup() {
pinMode(A0, INPUT);
pinMode(A1, INPUT);
pinMode(8, OUTPUT);
pinMode(A4, INPUT);
pinMode(A5, OUTPUT);
}
void loop() {
int val1 = 0;
int val2 = 0;
int val3 = 0;
int val4 = 0;
int val5 = 0;
int val6 = 0;
int val7 = 0;
int val8 = 0;
int val9 = 0;
int val10 = 0;
int sumval = 0;
int impuls = 120;   //select the pulse length depending on the frequency
int Delay = 0;
int base = 0;
Delay = analogRead(A4);
pinMode(A0, OUTPUT);
digitalWrite(A0, LOW);
pinMode(A0, INPUT);
digitalWrite(8,HIGH);
delayMicroseconds(impuls);
digitalWrite(8, LOW);
delayMicroseconds(Delay);
val1 = analogRead(A0);
digitalWrite(8,HIGH);
delayMicroseconds(impuls);
digitalWrite(8, LOW);
delayMicroseconds(Delay);
val2 = analogRead(A0);
digitalWrite(8,HIGH);
delayMicroseconds(impuls);
digitalWrite(8, LOW);
delayMicroseconds(Delay);
val3 = analogRead(A0);
digitalWrite(8,HIGH);
delayMicroseconds(impuls);
digitalWrite(8, LOW);
delayMicroseconds(Delay);
val4 = analogRead(A0);
digitalWrite(8,HIGH);
delayMicroseconds(impuls);
digitalWrite(8, LOW);
delayMicroseconds(Delay);
val5 = analogRead(A0);
digitalWrite(8,HIGH);
delayMicroseconds(impuls);
digitalWrite(8, LOW);
delayMicroseconds(Delay);
val6 = analogRead(A0);
digitalWrite(8,HIGH);
delayMicroseconds(impuls);
digitalWrite(8, LOW);
delayMicroseconds(Delay);
val7 = analogRead(A0);
digitalWrite(8,HIGH);
delayMicroseconds(impuls);
digitalWrite(8, LOW);
delayMicroseconds(Delay);
val8 = analogRead(A0);
digitalWrite(8,HIGH);
delayMicroseconds(impuls);
digitalWrite(8, LOW);
delayMicroseconds(Delay);
val9 = analogRead(A0);
digitalWrite(8,HIGH);
delayMicroseconds(impuls);
digitalWrite(8, LOW);
delayMicroseconds(Delay);
val10 = analogRead(A0);
sumval = val1 + val2 + val3 + val4 + val5 + val6 + val7 + val8 + val9 + val10;
sumval = sumval/5;
base = analogRead(A1);
if (sumval > base)
{tone(A5,1000);
delay(50);
noTone(A5);
}
else  {delay(50);
}
}
Schematics
Just do anything, Anything will lead to something else
KP
“Treat yourself like a King/Queen of this Universe” – KP
Most expensive things in this world is ‘Time’, ‘Trust’, ‘Character’, ‘Quality People’,
KP
Helping Hands.


Very interesting. Thanks.