
You’ll learn how to utilise the Adafruit Flora board and how to programme it using Codebender in this tutorial.
FLORA is an all-in-one wearable electronics platform from Adafruit.
It’s an Arduino-compatible spherical, sewable microcontroller meant to power incredible wearables projects.
All of the stainless steel threads, sensors, GPS modules, and chainable LED NeoPixels in the FLORA series are wearable!
Step 1: Flora’s Background
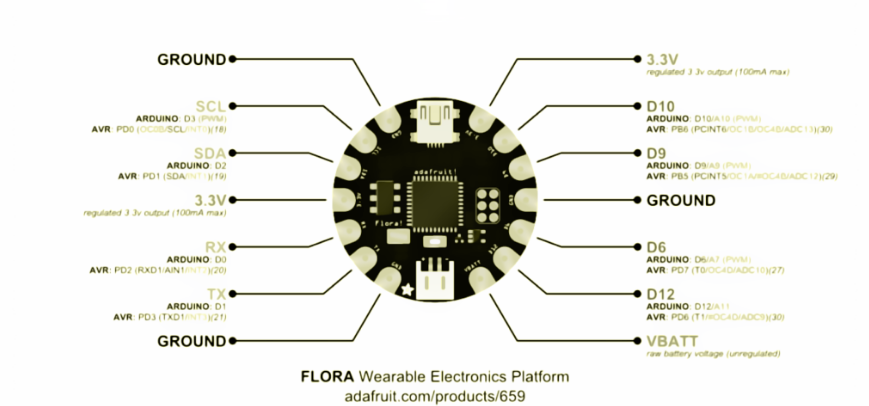
The Flora wearable board is powered by an Atmega32u4 microcontroller and includes a mini-usb port (the updated Flora v2 has a micro-usb port) as well as a reset button to reboot the system.
The power supply has been designed to be versatile and simple to use.
An onboard battery connector with a protective diode is available for use with external battery packs ranging from 3.5 to 9 volts DC (It can run on 3V but 3.5V-5V or higher is ideal).
The FLORA also contains an internal 3.3v 250mA regulator with a protection diode and USB fuse to ensure that the microcontroller voltage is stable and that common 3.3v modules and sensors can be powered.
The FLORA power system was created to make controlling and powering a large number of addressable NeoPixels simple.
Flora can easily drive 50 pixels from the onboard power source, or up to 500 if the pixels are supplied externally by a separate 5V supply!
FLORA is fabric friendly, with all components flush to the PCB and won’t snag delicate clothing (it does not use FTDI headers).
Power Well, digital signal LED for bootloader feedback, and data rx/tx are the four indication LEDs on the FLORA.
An ICSP connection is also included enabling experienced users to easily reprogram the device.
Flora v2 also has an RGB NeoPixel for even more vibrant illumination.
For attachment and electrical connections, there are 14 sewing tap pads.
For convenient module and sensor hookups, data buses are interleaved with power and ground pads, which eliminates the possibility of overlapping traces, which is impossible with conductive thread.
Step 2: Is This Your First Time Using It?
If you’re utilising the Codebender or Flora board with your computer for the first time, go here and follow the instructions to install the browser plugin and Arduino drivers.
The green power LED should be lighted, and the red bootloading LED should pulse, indicating that the Flora is ready to bootload.
You can always return the Flora back to the bootloader state by pushing the little onboard reset button if you’ve programmed it since acquiring it.
Step 3: Use Codebender to programme it!
Now we can write our own Trinket board programme!
We’ll programme the board with Codebender, but if you want to use the Arduino IDE instead, you’ll need to install Adafruit boards first.
Simply follow the steps outlined in this website.
You may use alligator clips, wires, or conductive thread to make the circuit!
I’m going to make my first wearable project with conductive thread.
Connecting a NeoPixel v2 to another:
Connect the “+” pin to the Flora 3.3V pin, the “-” pin to the Flora GND pin, and the “->” pin to the Flora D12 pin.
Now you may connect even more NeoPixels v2!
The “+” and “-” pins of each new NeoPixel led must be connected to the prior one, and the signal pin “->” will follow the previous “->” NeoPixel pin.
You are free to use as many as you like.
I made use of eight of them.
Code :
#include <Adafruit_NeoPixel.h>
#ifdef _AVR_
  #include <avr/power.h>
#endif

#define PIN 12

// Parameter 1 = number of pixels in strip
// Parameter 2 = Arduino pin number (most are valid)
// Parameter 3 = pixel type flags, add together as needed:
//   NEO_KHZ800  800 KHz bitstream (most NeoPixel products w/WS2812 LEDs)
//   NEO_KHZ400  400 KHz (classic 'v1' (not v2) FLORA pixels, WS2811 drivers)
//   NEO_GRB     Pixels are wired for GRB bitstream (most NeoPixel products)
//   NEO_RGB     Pixels are wired for RGB bitstream (v1 FLORA pixels, not v2)
Adafruit_NeoPixel strip = Adafruit_NeoPixel(100, PIN, NEO_GRB + NEO_KHZ800);

// IMPORTANT: To reduce NeoPixel burnout risk, add 1000 uF capacitor across
// pixel power leads, add 300 - 500 Ohm resistor on first pixel's data input
// and minimize distance between Arduino and first pixel.  Avoid connecting
// on a live circuit...if you must, connect GND first.

void setup() {
  // This is for Trinket 5V 16MHz, you can remove these three lines if you are not using a Trinket
  #if defined (_AVR_ATtiny85_)
    if (F_CPU == 16000000) clock_prescale_set(clock_div_1);
  #endif
  // End of trinket special code


  strip.begin();
  strip.show(); // Initialize all pixels to 'off'
}

void loop() {
  // Some example procedures showing how to display to the pixels:
  colorWipe(strip.Color(255, 0, 0), 50); // Red
  colorWipe(strip.Color(0, 255, 0), 50); // Green
  colorWipe(strip.Color(0, 0, 255), 50); // Blue
  // Send a theater pixel chase in...
  theaterChase(strip.Color(127, 127, 127), 50); // White
  theaterChase(strip.Color(127, 0, 0), 50); // Red
  theaterChase(strip.Color(0, 0, 127), 50); // Blue

  rainbow(20);
  rainbowCycle(20);
  theaterChaseRainbow(50);
}

// Fill the dots one after the other with a color
void colorWipe(uint32_t c, uint8_t wait) {
  for(uint16_t i=0; i<strip.numPixels(); i++) {
    strip.setPixelColor(i, c);
    strip.show();
    delay(wait);
  }
}

void rainbow(uint8_t wait) {
  uint16_t i, j;

  for(j=0; j<256; j++) {
    for(i=0; i<strip.numPixels(); i++) {
      strip.setPixelColor(i, Wheel((i+j) & 255));
    }
    strip.show();
    delay(wait);
  }
}

// Slightly different, this makes the rainbow equally distributed throughout
void rainbowCycle(uint8_t wait) {
  uint16_t i, j;

  for(j=0; j<256*5; j++) { // 5 cycles of all colors on wheel
    for(i=0; i< strip.numPixels(); i++) {
      strip.setPixelColor(i, Wheel(((i * 256 / strip.numPixels()) + j) & 255));
    }
    strip.show();
    delay(wait);
  }
}

//Theatre-style crawling lights.
void theaterChase(uint32_t c, uint8_t wait) {
  for (int j=0; j<10; j++) {  //do 10 cycles of chasing
 for (int q=0; q < 3; q++) {
      for (int i=0; i < strip.numPixels(); i=i+3) {
        strip.setPixelColor(i+q, c);    //turn every third pixel on
      }
      strip.show();

      delay(wait);

      for (int i=0; i < strip.numPixels(); i=i+3) {
        strip.setPixelColor(i+q, 0);        //turn every third pixel off
      }
    }
  }
}

//Theatre-style crawling lights with rainbow effect
void theaterChaseRainbow(uint8_t wait) {
  for (int j=0; j < 256; j++) {     // cycle all 256 colors in the wheel
    for (int q=0; q < 3; q++) {
      for (int i=0; i < strip.numPixels(); i=i+3) {
        strip.setPixelColor(i+q, Wheel( (i+j) % 255));    //turn every third pixel on
      }
      strip.show();

      delay(wait);

      for (int i=0; i < strip.numPixels(); i=i+3) {
        strip.setPixelColor(i+q, 0);        //turn every third pixel off
      }
    }
  }
}

// Input a value 0 to 255 to get a color value.
// The colours are a transition r - g - b - back to r.
uint32_t Wheel(byte WheelPos) {
  WheelPos = 255 - WheelPos;
  if(WheelPos < 85) {
    return strip.Color(255 - WheelPos  3, 0, WheelPos  3);
  }
  if(WheelPos < 170) {
    WheelPos -= 85;
    return strip.Color(0, WheelPos  3, 255 - WheelPos  3);
  }
  WheelPos -= 170;
  return strip.Color(WheelPos  3, 255 - WheelPos  3, 0);
}
Angry – Exercise alone, Envy – Have empathy, Anxiety – Breathe, Irritation – Don’t react, Tired – Go to bed, Uninspired – Take shower, Doubt – Introspect
KP
“Take a time, But don’t waste it” – KP
Helping Hands.

Ik hou van je voor het delen van dit ik was wanhopig op zoek naar het dankzij baby 😉